How to Connect Stripe or PayPal for Direct Sales on Your Squarespace Website
You’ve got a product or offer. You’ve built a page.
Now you need to get paid, easily, securely, and directly through your website.
The good news? Squarespace makes it simple to connect both Stripe and PayPal, so you can accept payments right on your site without third-party checkouts or complicated integrations.
Here’s how it works.
Step 1: Make Sure You’re Using a Commerce-Enabled Plan
To accept payments, your Squarespace site needs to be on a plan that supports Commerce features.
For physical or digital products, you'll need the Business Plan (with 3% transaction fee) or Commerce Plans (Basic or Advanced).
For Member Areas, you’ll also need a Member Areas subscription.
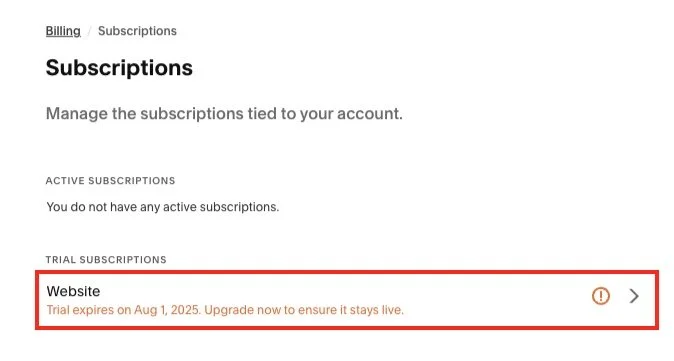
To check or upgrade your plan:
Go to Settings → Billing → Subscriptions


Step 2: Set Up a Stripe or PayPal Business Account
You’ll need active, verified accounts with the platforms you want to connect.
Stripe
Go to stripe.com and click Start Now
Set up your business details (name, bank info, etc.)
You’ll receive a dashboard once your account is verified
PayPal
Go to paypal.com/business
Create a Business Account (not personal)
Link your bank and confirm identity
You can use one or both, Squarespace allows both payment methods at checkout, giving your customers options.
Step 3: Connect Stripe or PayPal to Squarespace
1. In your Squarespace dashboard:
Go to Settings → Selling → Payments

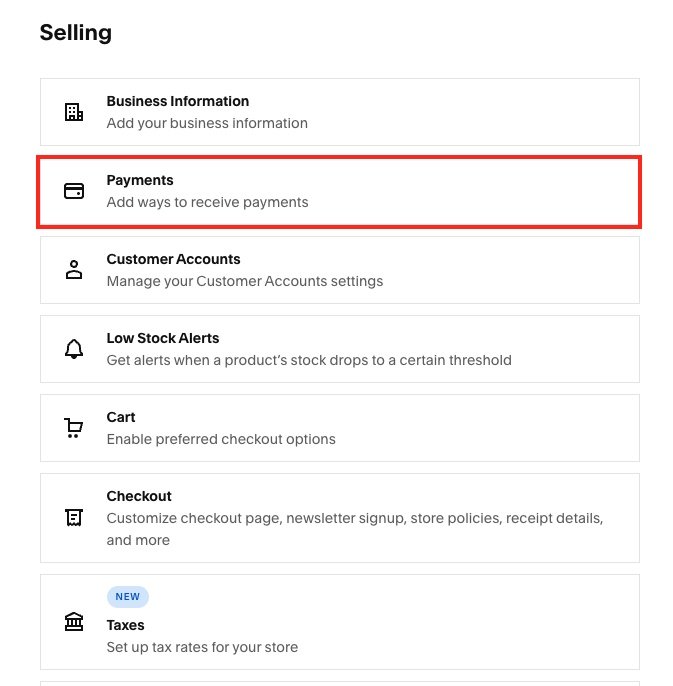
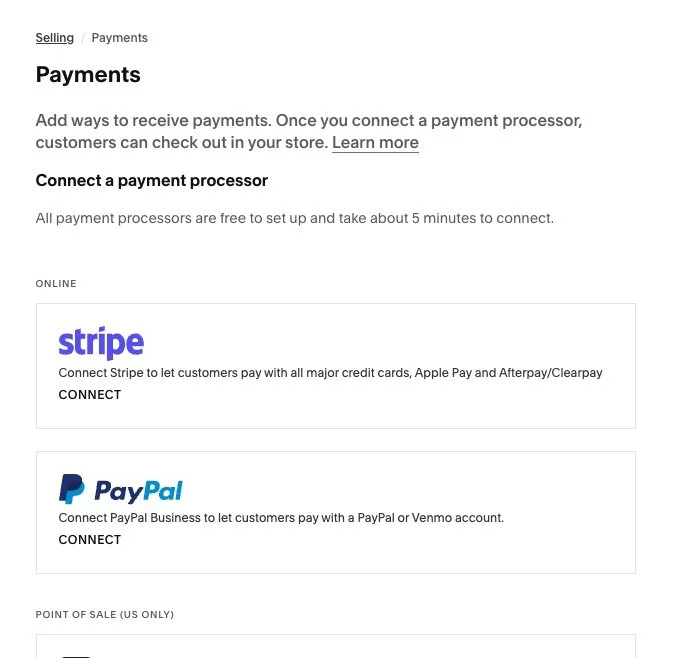
2. Under “Connect a payment processor,” choose:
Stripe → Click Connect, log in to your Stripe account, and authorize
PayPal → Click Connect, log in, and confirm access
Once connected:
Your checkout will automatically show the payment options
You’ll be able to track sales in both Squarespace and your payment dashboards
You can disconnect or switch platforms anytime from the same area.
Step 4: Add Products or Paid Content
Now that payments are set up, you can add:
Digital Products
Go to Commerce → Products → Add Product → Digital
Upload your file (PDF, ZIP, audio, etc.)
Set your price
Connect your product to a page or button
Member Area Content
Add your paid content behind a Member Area
Set access levels (free, paid, recurring)
Connect your payment method under Settings → Member Areas → Billing
Services or Bookings
Use the Scheduling block or custom checkout buttons
Pair with Stripe/PayPal for payment collection
Optional: Customize Your Checkout Experience
You can personalize your checkout with:
Custom thank-you pages
Order confirmation emails
Discount codes (available on Commerce plans)
Customer info fields (name, email, notes)
All of these can be adjusted under Commerce → Checkout or Customer Notifications
Bonus Tip: Track Sales Easily
Once Stripe or PayPal is active, your sales will show up in:
Commerce → Orders (inside Squarespace)
Your Stripe Dashboard or PayPal Dashboard
This lets you:
Track revenue and payouts
View customer info
Send refunds or receipts
Final Thought
You don’t need a separate storefront or third-party platform to sell online.
With Squarespace + Stripe or PayPal, you can:
Sell products or services directly from your site
Accept secure payments from anywhere
Create a smooth, branded checkout experience
Keep everything in one place, no switching tabs or tools
Simple. Direct. Built-in.